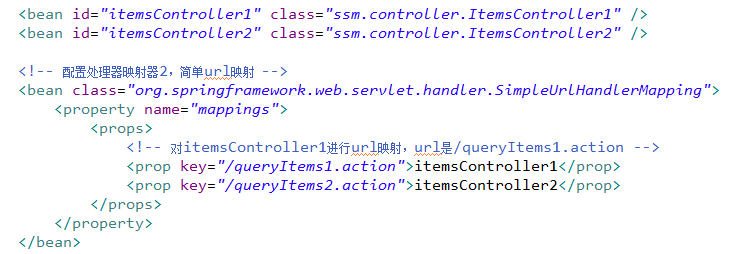
从上一篇的springmvc入门中已经看到,springmvc.xml中的配置了映射器和适配器,是使用非注解的方式来配置的,这是非注解方式的一种,这里再复习一下:
1. 非注解方式
1.1 处理器适配器
上一节中使用的处理器适配器是:org.springframework.web.servlet.mvc.SimpleControllerHandlerAdapter。即: 

public class ItemsController2 implements HttpRequestHandler { @Override public void handleRequest(HttpServletRequest request, HttpServletResponse response) throws ServletException, IOException { //实际中是调用service查找数据库,查询商品列表,这里直接使用静态数据来模拟了 List itemsList = new ArrayList (); //向list中填充静态数据 Items items_1 = new Items(); items_1.setName("联想笔记本"); items_1.setPrice(6000f); items_1.setDetail("ThinkPad T430 联想笔记本电脑!"); Items items_2 = new Items(); items_2.setName("苹果手机"); items_2.setPrice(5000f); items_2.setDetail("iPhone6苹果手机!"); itemsList.add(items_1); itemsList.add(items_2); //设置模型数据 request.setAttribute("itemsList", itemsList); //设置转发的视图 request.getRequestDispatcher("/WEB-INF/jsp/items/itemsList.jsp").forward(request, response); //使用此方法可以通过修改response,设置响应的数据格式,比如响应json数据 /* response.setCharacterEncoding("utf-8"); response.setContentType("application/json;charset=utf-8"); response.getWriter().write("json串");*/ }}
前面获取数据都是一模一样的,后面转到视图部分和实现Controller接口是不同的,实现HttpRequestHandler接口的话,最后这里处理和原来的servlet是一样的,往request域中存入数据,然后跳转到新的jsp视图页面。不过这种方式还可以修改response,设置响应的数据格式等。 不管是用那个适配器,一个相同点就是:每个Handler中只能有一个方法,因为要继承Controller或者HttpRequestHandler,就要重写相对应的那个方法,在那个方法中处理逻辑。也就是说一个Handler中不能有两个方法或两个以上的来处理不同的逻辑,这是弊端,但是也有它的好处,限定了程序员的编程,比较规范。 这两个适配器可以同时使用,我测试了一下,不会冲突,我配了两个适配器,写了两个Handler,分别去实现Controller和HttpRequestHandler接口,都可以被执行。
1.2 处理器映射器
上一节中使用的映射器是:org.springframework.web.servlet.handler.BeanNameUrlHandlerMapping。即: 

2. 注解方式
2.1 处理器适配器和映射器
在spring3.1之前使用:
注解映射器:org.springframework.web.servlet.mvc.annotation.DefaultAnnotationHandlerMapping
注解适配器:org.springframework.web.servlet.mvc.annotation.AnnotationMethodHandlerAdapter
在spring3.1之后使用:
注解映射器:org.springframework.web.servlet.mvc.method.annotation.RequestMappingHandlerMapping
注解适配器:org.springframework.web.servlet.mvc.method.annotation.RequestMappingHandlerAdapter
毫无疑问,现在都已经到了版本4以上了,肯定有后者了,如果使用了注解方式的适配器和映射器,就不需要前面那些非注解的适配器和映射器了,所以只需要两行代码即可: 
@Controllerpublic class ItemsController3 { // 商品查询列表 // @RequestMapping实现 对queryItems方法和url进行映射,一个方法对应一个url // 一般建议将url和方法写成一样 @RequestMapping("/queryItems") public ModelAndView queryItems() throws Exception { // 实际中是调用service查找数据库,查询商品列表,这里直接使用静态数据来模拟了 List itemsList = new ArrayList (); // 向list中填充静态数据 Items items_1 = new Items(); items_1.setName("联想笔记本"); items_1.setPrice(6000f); items_1.setDetail("ThinkPad T430 联想笔记本电脑!"); Items items_2 = new Items(); items_2.setName("苹果手机"); items_2.setPrice(5000f); items_2.setDetail("iPhone6苹果手机!"); itemsList.add(items_1); itemsList.add(items_2); // 返回ModelAndView ModelAndView modelAndView = new ModelAndView(); // 相当于request的setAttribute,在jsp页面中通过itemsList取数据 modelAndView.addObject("itemsList", itemsList); // 指定视图 modelAndView.setViewName("/WEB-INF/jsp/items/itemsList.jsp"); return modelAndView; } @RequestMapping("/queryItems2") public ModelAndView queryItems2() throws Exception { // 实际中是调用service查找数据库,查询商品列表,这里直接使用静态数据来模拟了 List itemsList = new ArrayList (); // 向list中填充静态数据 Items items_1 = new Items(); items_1.setName("联想笔记本2"); items_1.setPrice(6000f); items_1.setDetail("ThinkPad T430 联想笔记本电脑!"); Items items_2 = new Items(); items_2.setName("苹果手机2"); items_2.setPrice(5000f); items_2.setDetail("iPhone6苹果手机!"); itemsList.add(items_1); itemsList.add(items_2); // 返回ModelAndView ModelAndView modelAndView = new ModelAndView(); // 相当于request的setAttribute,在jsp页面中通过itemsList取数据 modelAndView.addObject("itemsList", itemsList); // 指定视图 modelAndView.setViewName("/WEB-INF/jsp/items/itemsList.jsp"); return modelAndView; }}
从上面的代码中可以看出,首先,我一个Handler中可以写多个方法了,现在是两个,逻辑一模一样,就是item的名字稍微变了一下好用来测试。在类的上面加上@Controller注解,可以指定bean的名字,也可以不指定,默认为类名首字母小写。然后url映射交给@RequestMapping类处理,可以指定url,一个url对应一个方法。 这样就很清晰了,前台传了个url进来,映射器根据这个url找到Handler,然后根据Handler选择一个适配器去执行,这里全部用的都是注解,这样就将url和这个Handler连到一起了,也把url和具体的处理方法连到一起了,由此可见,使用注解的开发方式比较方便。开发中常用的是注解的方式。
2.2 继续优化注解
使用注解要注意一个问题,就是注解适配器和映射器必须配对使用,也就是说,不能一个用注解,一个用非注解。要用一起用,要么都不用。其实在springmvc中还有更加简便的注解: 
